If other blogs about blogging basics are Blogging 101, then this is Blogging 99: the very foundational, most basic-of-basic blogging tips that you need to know when you’re writing your blog posts.
These 6 basic blogging tips will make your blog posts so much easier to read and digest – which, as a copywriter and messaging specialist, is always my aim when I’m writing.
They’ll also ensure that the content you write is doing the most for your SEO, which is why Studio Cotton, a website design studio who focus on websites that actually work as well as looking swish, asked me to write about it for them.
So, just like that song that I couldn’t tell you the artist of for the life of me but gets stuck in my head a disproportionate amount: let’s get baaaaaack to basics.
1. Format your blog post with an introduction, the body, and the conclusion
No matter what your subject matter, a blog post should always follow this format:
- Introduction: introducing the topic and any surrounding context to your readers
- body: the meat of what you wanna say
- and conclusion: rounding it off so that your readers don’t feel like they’re left hanging
It’s generally (perhaps counter-intuitively?) way easier to write the body of your blog post first, then top and tail it with an introduction and conclusion once you know exactly what you’re introducing and concluding.
Then in your introduction, you can set the scene for the topic. This usually involves a brief explanation of what your reader can expect from the blog post, as well as any surrounding context that they need.
You should also introduce yourself here, too (like I did above), as most folk landing on your blog won’t have any idea who you are. For Studio Cotton, for example, 97% of their blog visitors hadn’t visited their website before (maybe you’re one of them?).
Then Aime asked me for my own Eleanor Mollie website stats and, drumroll please: again, 97% of my blog visitors hadn’t visited my website before that post. Them being the same percentage feels a bit anti-climactic if we’re being honest, but at least it drives our point home.
As for your conclusion, it doesn’t need to be another groundbreaking section: it just needs to act as a neat bow that ties the blog post up. It can literally be something like “And that’s the thing I said I would write, if you want more from me go here…”!
So, to recap: Introduction, body, conclusion.
Writing a how-to post? Introduction, body, conclusion.
Publishing an interview? Introduction, body, conclusion.
Adding a listicle to your blog? It’s your classic IBC, baby.
(Here’s a list of listicle ideas for your next blog, if you’re looking for inspiration.)
2. Don’t fluff up your text styling
Though it can be super tempting to go for every visual element under the sun (early 2000s Microsoft Word Art, I’m looking at you), keep in mind that we’re working more in the realm of documents and essays rather than jazzy magazines.
That means that your text styling should be predictable, and formulaic, as it helps our brain focus on the actual content of the words without being distracted (science!).
Stick with an ultra-legible font, sentence case, left aligned, at least 16px (the Studio Cotton team like to push for 18px+), around 1.3-1.5em light height. Oh, and don’t you even think about expanding that letter spacing. Don’t. You. Even.
3. Use Heading 2 (H2) for your article subheadings
Your subheadings should always be a Heading 2, or H2 as they’re sometimes called.
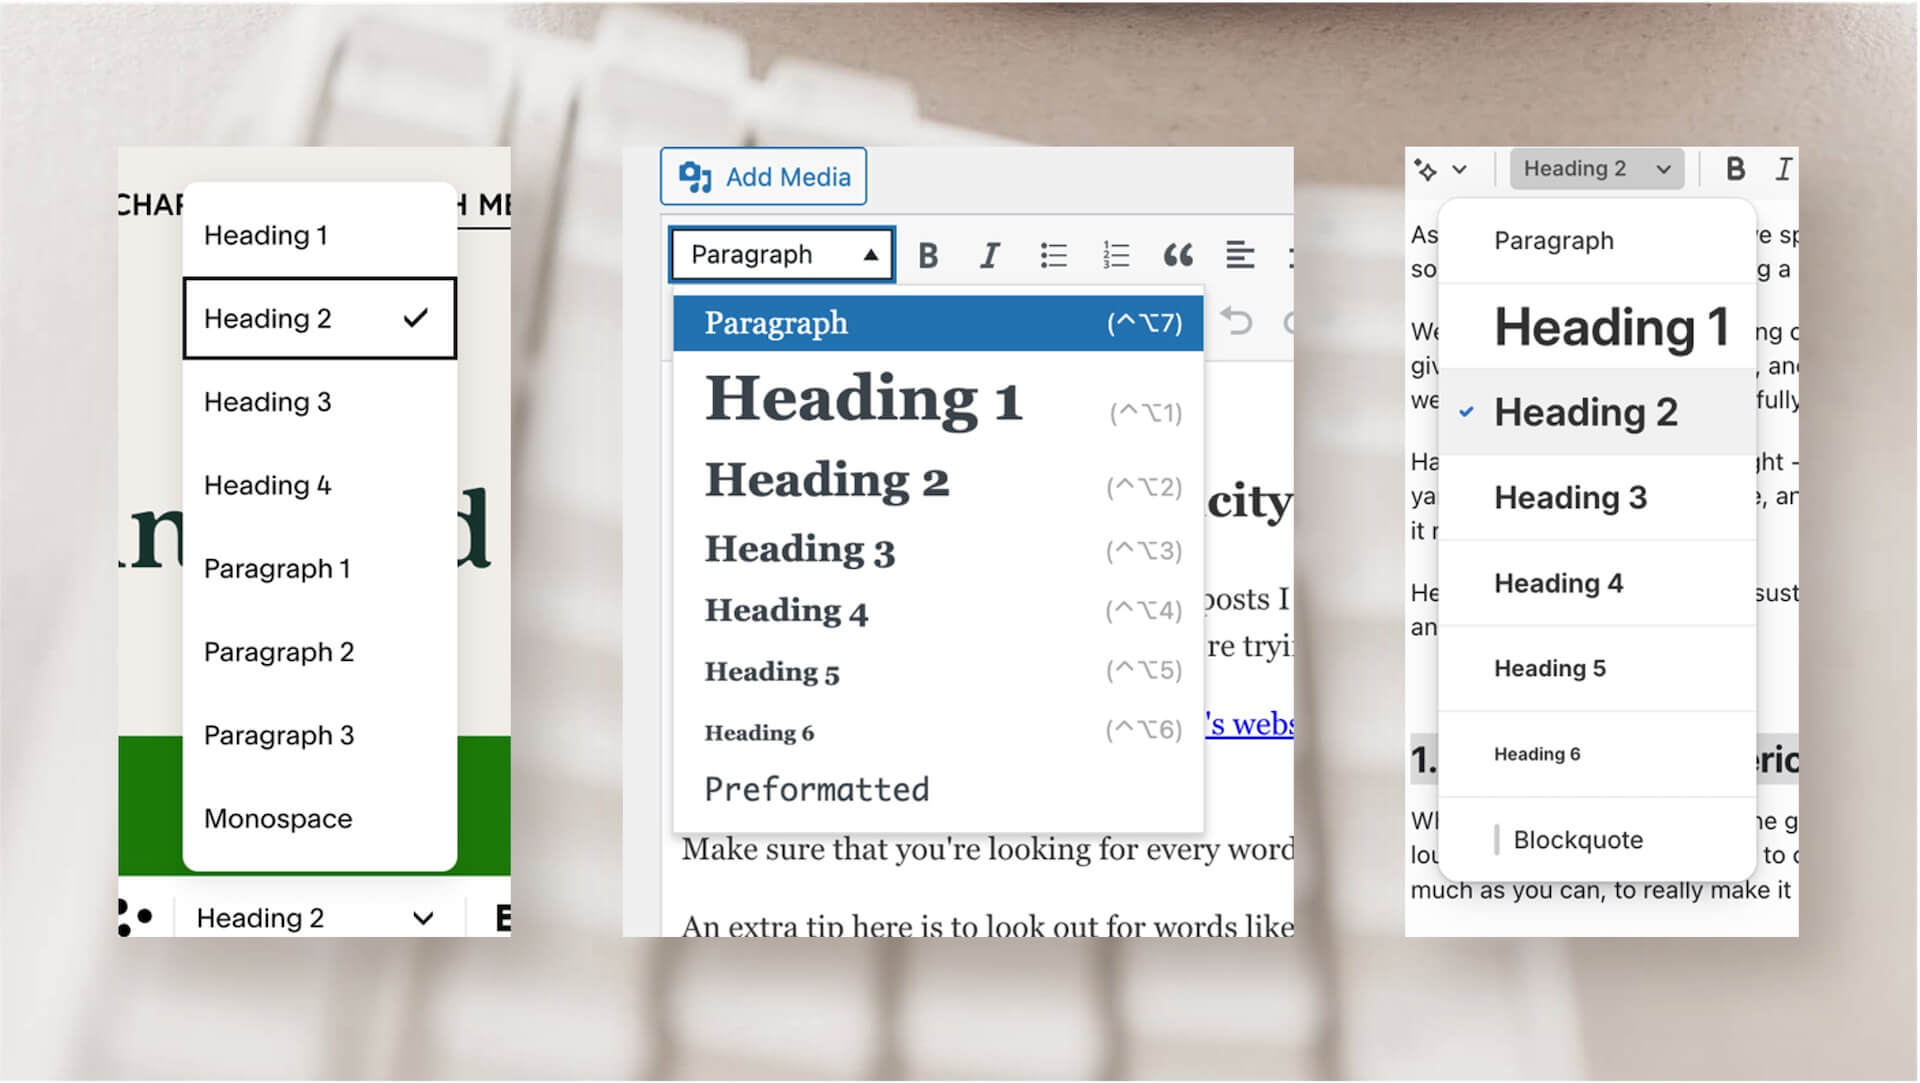
This isn’t just increasing the text size, or making it bold: this is a different setting to body (or paragraph) text – and it’s the technically correct setting for your headings.
And not “technically correct” like a snarky loophole, as in it is the correct technical setting for your headings, and means Google can better understand your blog article content.
Using Heading 2 the right way makes a huge difference to your SEO, so make sure you use it!
What if you need a subsubheading?
Great question – that’s what Heading 3 (or H3) is for.
4. Add line space around certain elements
(A line space is just hitting “enter”).
Whilst we’re on the topic of headings, it’s always good to include a line space before a heading, so that it sits closer to the text it’s about than the text that came before it.
Again, it’s easier for the eyes, and therefore the brain, to parse, meaning your brilliant words are going to land easier and stick better.
Something else that requires a little space in your blog post is your imagery, so that it can breeeeeathe. Without that space, it can all feel too cluttered and the impact is lost. Here’s a stock photo of some stressed out business people with no lovely empty lines above and below it.

Woah, so cramped, so tight.
Now let’s cheer them up with some generous spacing, to demonstrate how those line breaks help the pic breathe and keep your blog flowing.

Great job, stock business people. Great job indeed.
5. Avoid images in a portrait orientation
Portrait images may be excellent Instagram fodder, but they’re not so good for your blog posts because they make it look like you’ve reached the end of your article, especially on a laptop/desktop. See…

You see, we want to give people as easy a journey as we can whilst reading the article, with as little “friction” as possible – and scrolling through a ginormous portrait photo with no end in sight can feel pretty frictionful.
With landscape or square photos, it’s generally easier to see that the blog post carries on, in a smooth and frictionless experience.
6. Use multiple words when you’re creating a link
Just like headings, links are a key piece of SEO architecture, but they have to have some context. When you’re creating a link (whether it’s an external link to someone else’s website, or an internal link to a different page within yours), you want to highlight multiple words in the link to give as much context as possible for where the link is directing people to.
For example, if I were to use the above paragraph to link to one of Aime’s blog posts about backlinks, it wouldn’t be much good if just did it on the word ‘links’ – it doesn’t add any context, and it’s just too small top click/tap on.
Instead, I’m going to do it on the whopper clause of “links are a key piece of SEO architecture”, because that speaks exactly to what the piece is about.
And please, please, please, do NOT write click here as your link. With the greatest link in the world, it’s pretty much dead air – and you deserve much better!
The eagle-eyed among you have probably noticed that was the end of the body, and we’re now in the conclusion. See how I’m not having to do anything in particular, just drawing your attention to the idea that this blog post is nearing its end?
I’m also not bringing in a huge GOTCHA moment for the final few seconds – because we want the impact up top and throughout, not buried away.
If you feel you’ve completed Blogging 99, you’ve got the basics on lock now, and you want to soak up more SEO wisdom, then I’ve got good news for you: the Studio Cotton blog is FULL of gems like that. Try this one with 11 fab reasons that blogging boosts SEO, or, if time is against you, 15 tips for speedier blogging.
(Look at those long links! Chef’s kiss!)